universeodon.com is part of the decentralized social network powered by Mastodon.
Be one with the #fediverse. Join millions of humans building, creating, and collaborating on Mastodon Social Network. Supports 1000 character posts.

Administered by:

Server stats:

3.4K
active users

Learn more

#homeec

0 posts0 participants0 posts today

It may sound odd but

Today Anna and I upgraded all the servers in the servercore with MST3K in the background and had some pizza made by Paul and some pie made by a grocery store.

And it was a really nice day.

I am so pleased that (with the help of the Mastodon discord on that server) we got all the server OSes upgraded and back up and running and cleaned up some stuff while we were at it.

Just being able to… get some stuff done without it being a goddamn nightmare or a huge fight or anything. Just mostly sitting around and chatting some while upgrading stuff and getting things that broke working again without too much of a fuss.

could use days like this more often, not gonna lie

how was your day?

oh yeah, november 16th went by

November 16th, 2023, was the day I started logging biking miles per hundred on Mastodon. I didn’t check the odometer on the date this year, but it would’ve been around 2940, which means totalling 1,440 miles (2,317 km) in the previous 12 months.

That works out to about 28 miles/45 km a week or 120 miles/193 km per month.

That’s more than Anna and I put on our car combined, which exists pretty much entirely for certain cargo-carrying purposes. Not too bad.

The weather’s pretty good today. Cold, but clear and dry. I should run by the hardware store, pick up some copper and steel wool.

If you don’t know this already, copper is incredibly good for scrubbing oven racks, because it’s softer than the rack metal but harder than food, so it really cuts through whatever might’ve got baked on without scarring the metal underneath.

It is absolutely the best way to clean an oven or toaster rack is what I’m saying. I suspect that’ll be an important tip for some of you today, or tomorrow, depending upon how prompt you are about scrubbing up. 😀

Anyway, like I said, it’s a nice day. Let’s go bike.

making the bagel dough balls for the second rise

Okay, so I didn’t describe making the bagel dough rounds so they’re smooth and easy to make into nice even bagels in my very detailed bagel recipe. In fact, I’ve basically never shown it before at all, and people want to know. So let’s do that.

This happens after the first rise, when the dough has been allowed to sit for an hour and have a nice long nap, growing rapidly under a towel. You’ll want to have already divided the dough into eight equal-weight lumps, as per the written recipe above, and then you’re ready to make those lumps nice and smooth.

First, grab one of your dough lumps, and find the smoothest part of it. Put that side down into your palm.

Put your thumb in the middle on the rough side, and pull all the edges around your thumb up. The smooth end will stretch, and get even smoother, when you do this. It’ll look kind of like an opening xenomorph egg but will not – I stress will NOT – eat your face, or implant any eggs in your body.

Then press all those high bits together and then down into the centre of the ball, pinching all the seams together. You’re closing the xenomorph egg back up, which is why it will not eat you. And also how it’ll get smooth all over.

You’ll want to repeat this a couple of times. Each time the smooth side will stretch more and get smoother, and the rough side will improve as well. Make sure that you’re pulling all the side bits together in the centre; don’t leave any sticking out, and pinch closed all the seams.

After a couple of goes at this, you’ll end up with a nice fairly-smooth rough side, and a very smooth smooth side. Here’s a good “rough” side; you can see that really, it’s fairly smooth, other than one tab towards the bottom that still needs to be pulled in:

Once you’re satisfied, you can smoosh the entire ball down a little on your kneading surface – whatever that happens to be – rough side down. Roll it a little, to help the dough bind to itself. Then put it on your parchment paper baking sheet, again with the rough side down to let it proof. As it rises for the second time, it’ll smooth the bottom out even more.

If it’s not perfectly smooth after all this, it’s still fine. When you go to boil, boil with the rough side up first, then flip over to boil with smooth side up. Then put it back on the baking tray, keeping the smooth side up for baking.

I know this sounds a little like keeping good side/bad side straight when sewing, but… it should make sense when you do it, and it’s easier than sewing, since there’s no “oops, I forgot this turns inside out” to get wrong.

After the proofing is done, then with a little bagel fingering to put in holes, we’re ready to go into the water!

To get the bagels into the water, use a hurricane or a well-perforated giant spoon or whatever you have. Believe me, this is way easier than doing it by hand, and also helps preserve the shape.

The bagel in the hurricane in this photo is rough-side up; the bagel still on the sheet is smooth-side up. You can still see a difference but it’s really negligible.

All of the bagels in the next photo are just into the water with rough sides up, set to boil for two minutes. As you can see, this side is still less smooth than the smooth sides! But these are well into “no one will notice or care” territory, and again: it’s fine. Boil them for two minutes, flip with the hurricane, boil for two minutes more.

(Or boil for less time for a less chewy bagel, just make sure the boiling time is the same on boths ides.)

Boiling is a good time to oil the empty side of your baking tray, so take care of that at the same time.

After the second boil, just lift out with your hurricane and place the bagels back on your now-oiled baking tray. They’ll shrink and wrinkle some before going into the oven, that’s fine; they’ll expand back out in the oven. This is, as per the recipe, when you do any toppings.

See? This bagel got wrinkly. I don’t know why. They all do it to some degree, but despite all having the same amount of dough (within one gram) they’ll shrink differently. But it doesn’t matter, they’ll come out fine:

Also, while this is a bit out of scope for this how-to on smoothing your bagels, you’ll want to apply the egg wash to as much of the bagel as possible. For me, that means making sure the sides and the walls of the hole are coated, down to the parchment paper. But don’t let egg pool up and form puddles – or if that happens, make sure you tear it off before serving or putting the bagels away. Again, they’ll be fine.

Like so! All baked, out of the oven, and onto cooling racks, expanded nicely back out with no wrinkles.

Here’s what a random bagel bottom looks like, this one still very hot ow ow ow ow ow ow ow

They’re a bit soft, still, at this point, so it really is best to let them cool at least a bit before eating.

Enjoy your #bagels !

[link] #HomeEc #bagels #baking #HomeEc

solarbird.netAn updated recipe for delicious bagels – Solarbird{y|z|yz}, Collected

An updated recipe for delicious bagels

I like to post progress notes and photos to Mastodon while doing my Sunday baking. It mostly ends up being about bagels, but not always – sometimes I’ll make baguettes or sweetbreads or something else entirely.

But mostly, it’s all about the #bagels. I post about bagels so regularly that people have started using my bagel posts as a warning that Monsterdon – the weekly monster-movie watch with live commentary – is incoming.

(#monsterdon is in fact a monster, trending Federation-wide each Sunday evening, starting shortly after my baking posts wrap up. It’s great. Follow #MonsterdonAlert for news and voting on which films to watch.)

Anyway, in response to my latest baking thread, MHowell asked me if I’d blogged about baking bagels, particularly for people who bake only occasionally. And the answer was… sort of? So I threw them a short post that linked my recipe.

But since it’s been a while – and I’ve learned some things – here’s a new, more comprehensive version of the bagel recipe! This version adds more dough variations, includes a couple of important process discoveries, and explains a bunch of steps left unexplained in the original.

It is a bit wordier, I’m afraid, but it is very complete, which should make it good for beginners and occasional bakers.

Unfortunately, that also keeps it from fitting onto a single page, so it’s RTF only this time. If you want a single-page version like last time, you’ll have to put together your own. (ETA: And even so, I didn’t have room to describe how to make your bagels nice and smooth and regular. So have a second post just for that.)

Of course, the more you do this, the less you’ll need the recipe – I barely reference it these days, and then only for ingredient weights. But if that’s you, you probably don’t need a recipe! At least, not more than once.

Anyway. Enjoy DELICIOUS BAGELS! ^_^

[link] #HomeEc #bagels #baking #HomeEc #MonsterdonAlert

patreon doesn’t always tell you

Someone upped their Patreon donation this month by a dollar! The odd thing about that is that Patreon doesn’t tell you who does that when they do it, apparently – I got the notification but I have no way to see who did that. So thank you, whoever you are – I appreciate every little bit, because every little bit helps, particularly with Anna still out of work since her last contract.

(We’re mostly treading water on just my income? But really, we’re sinking a little every month. It’s slow, but, well, it’s real. If you like my writing, or my bike maps, or my whole “run a Mastodon instance” hobby and want to support it, thank you, and here’s the link.)

Talking of Anna, she’s looking for freelance jobs doing work like proofreading, web testing, and WordPress setup while still trying to get a new contract. It’s been hard with local tech in general and Microsoft in particular laying off people in the several thousands every month, so if you’ve got a project needing that kind of work, chat her up.

Anyway, thanks again to whoever upped their donation. It’s greatly appreciated. (ノ◕ヮ◕)ノ*:・゚✧ 💖

[link] #HomeEc #writing #awesomeBusinessCrap #boringBusinessCrap #HomeEc

@lizduckchong

I’m all about STEAM, the ‘A’ For arts.

Even better: STAMEN, for Science, Technology, Arts, Mathematics, Engineering, and Nature.

Even betterer: add an F fit fitness, and a FACS for family and consumer sciences (so you can cook and sew).

#STEAM#stamen#stem

blinked out on me like a double-striped peppermint stick

Had a very surprising moment as I was going down the front stairs today to go out biking and two of the stairs disappeared out from underneath me, blinking out of existence like a double-striped peppermint stick

Of course they had not actually disappeared, it just turned out the fuckers who installed them used framing nails in an outdoor application and guess what they’ve been rotting out from the inside allllll along

(To be clear, the nails have been rotting out, the wood seems to be fine.)

Fortunately it was me and not any of the delivery people, my reflexes are pretty good and I just ended up sitting on the next surviving stair going “wha happen?!”

Pics at Mastodon if you’re into it

[link] #HomeEc #HomeEc #murknorth

MastodonSolarbird :flag_cascadia: (@moira@mastodon.murkworks.net)Attached: 1 image SURPRISE All the nails sheered. Neat! guess I’m fixing this today instead of biking

don’t buy KIDDE anything

just had the joy of yet another false alarm on our interconnected KIDDE brand smoke detectors

a bit after midnight, it’s usually in the middle of the night, and since one goes off means they all go off you get to play the amazing FIND THE SCREAMING MONSTER CONTROLLING ALL THE OTHER SCREAMING MONSTERS game

this is number five to fail, three from one pack, two purchased replacements, one optical (which was the one to go up tonight), KIDDE refuses to honour the warranty on any of them so FUCK YOU KIDDE

since there’s literally fuck and all i can do about this other than scream FUCK YOU KIDDE i’m just gonna tell everybody DO NOT BUY ANYTHING FROM KIDDE EVER.

i really hoped going optical would help BUT NOPE

fucking shitheels

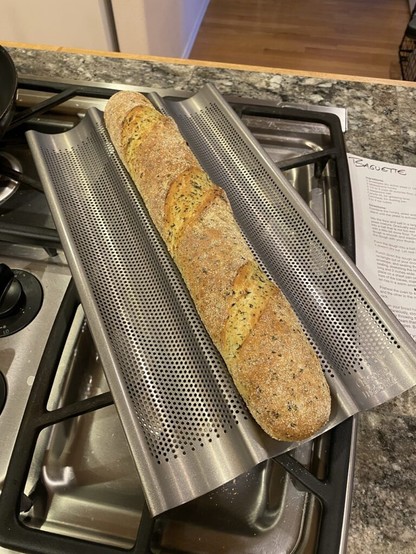
experimental spinach feta baguette

We used to have a Great Harvest bakery in walking/biking distance of our house, and occasionally they’d make a spinach feta bread that I liked well enough – particularly toasted, which brought out the best parts of it.

For whatever reason, it stopped being a Great Harvest and started being an independent bakery, and we kept going to it, but then it closed for a while and now it’s reopening as mostly a cafe. So I thought I’d do some experimental baking and create a similar bread, probably in baguette form since I’m good at that and it’s a safe starting point.

I was pretty sure they were using dried spinach, so I bought some fresh from the closest grocery and dried it myself. I also skimmed a bunch of other recipes for spinach feta, most of which were extremely unlike the bread I wanted, but which at least gave me some ideas for baking.

And then this past Sunday I went ahead and tried what I’d come up with, and not gonna lie, I’m really, really happy with how it came out. It’s like what I remember, but honestly better. It’s about as good un-toasted as my memory of the toasted version, and toasting the slices makes it better still, turning the crust into its own entity in a really tasty way.

Here’s my attempt to throw what I did into recipe form. If anyone tries it, please let me know how it goes! And what I’m missing, because I’m probably missing something in these instructions, something I just kind of assume.

Spinach Feta Baguette recipe (version 1)
(makes one loaf; maybe doubled for two.)

  • 2 cups all-purpose flour
  • Dried spinach flakes (one bundle fresh from grocery, dried at home, however much that is)
  • 1T honey
  • 1/2 cup warm water
  • 2T olive oil
  • 10g yeast
  • 1 tsp salt
  • 1/2 tsp cumin
  • 1/2 tsp garlic powder
  • 1/2 tsp dried onion flakes
  • 1/4 cup feta cheese crumbles

Preheat water for 30 seconds in microwave. Add honey and yeast, then stir to combine. Let sit for 5-10 minutes, until you have a good bit of foam.

At the end of that time, add 1T olive oil and whisk. Mix the combined result into 1/2 cup flour, and set aside in a bowl to become spongy.

Separately, combine remaining flour (1.5 cups) with salt and spinach flakes in a bowl; mix together with a dry whisk.

Heat a small pan with 1T olive oil over medium low. Take 1/2 tsp cumin, 1/2 tsp garlic powder, and 1/2 tsp dried onion flakes, and toast on stovetop until well fragrant – about two minutes. Allow to cool slightly, then mix with 1/4 cup feta cheese crumbles and set aside for later.

Once the wet dough has become spongy, add it to the set-aside dries (remaining flour, salt, and dried spinach) and knead together for 10 minutes. Place into a bowl (oiled if necessary), cover with a damp towel, and leave to rise for 30 minutes.

Extract the dough from the bowl. Form a dish out of the dough and fill with the feta and toasted seasonings. Knead together until well mixed, roughly three minutes.

Once well mixed, form the combined dough into a rectangle and shape into a baguette using an envelope fold.

Place raw baguette onto your preferred baking tray and slice three slices into the top, each 10-15mm/roughly 1/2 inch deep.

Cover with parchment paper and allow to proof/rise for 30 more minutes. While bread is proofing, place a metal tray onto a rack at the very bottom of your oven, with another rack halfway or just below halfway in the oven. Preheat the oven to 425°F.

Once oven is ready and proofing is complete, place baking tray onto the top rack, throw a few cubes of ice onto the metal tray on the bottom rack, quickly remove the parchment cover, and immediately close the oven door.

Bake for 15 minutes.

Makes one baguette. Allowing to cool is good, but the bread may be eaten warm. It is particularly good sliced and toasted.

@spiegelmama Trivial!

STEP 1:
1 regular box graham crackers (roughly 4 cups once ground up)
3 tsp baking powder

crumb the graham crackers with a food processor or blender and mix together in a bowl

STEP 2:

2 eggs
1 regular (15oz) can of pumpkin

blend in a second bowl

STEP 3:
Beat wet into dry, pour result into greased loaf pan (I used butter), bake 50-60 minutes in a preheated 350°F oven.

50 minutes was correct for our oven.

Frost as you like, I used a cream cheese frosting.

Done!